Relieve Sciatica with Nerve Flossing
How to Do Nerve Flossing for Sciatica Relief (Step-by-Step with Caution Guidelines)
🎥 Prefer to watch?
Click here to watch the video version of this article.
In this straight-to-the-point video, I’ll show you how nerve flossing can help relieve your sciatica. I’ll teach you exactly how to do it quickly and then help you understand when you should do it — and when you shouldn’t.
👉 Want more help with your back pain?
Check out my Free Mini Course that teaches you 4 foundational techniques to start reducing pain and restoring mobility today.
Why Sciatica Happens
That sharp, shooting pain running down your leg often comes from a nerve that isn’t gliding properly.
Your nerves are designed to slide and glide through surrounding tissues as you move. But if a muscle, joint, or bit of connective tissue becomes tight or irritated, the nerve can get impinged.
Instead of gliding, it gets stretched — and nerves really don’t like being stretched. That’s when pain and irritation begin.
What Is Nerve Flossing?
Nerve flossing is a technique used to restore that smooth gliding motion.
Think of it like flossing your teeth — you gently pull from one end while giving slack on the other. Repeating that motion through a narrow or restricted area can:
-
Free up the tissue around the nerve
-
Help the nerve move more easily
-
Encourage healing and mobility
-
Reduce pain and sciatica symptoms
The most common restriction is near the spine where the nerve exits the canal. Flossing helps clear that space so the nerve can move freely again.
⚠️ A Word of Caution
Nerve flossing works well for many people — but not everyone.
In some cases, it can increase irritation and make symptoms worse.
If that happens to you, stop. Don’t push through the pain.
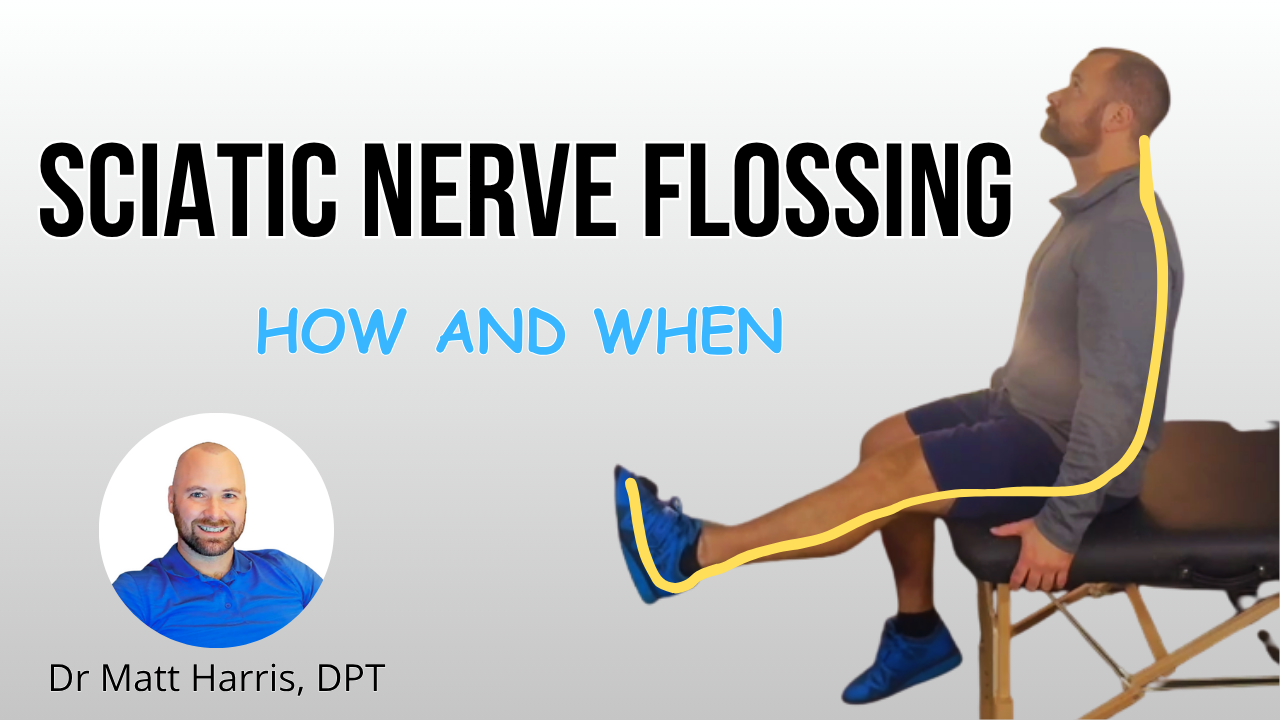
How to Do the Sciatic Nerve Floss
Here’s the basic step-by-step technique:
Step 1:
-
Look up toward the ceiling
-
Straighten your leg
-
Point your toes up toward the ceiling

Step 2:
-
Look down toward the floor
-
Bend your knee
-
Point your toes down toward the floor
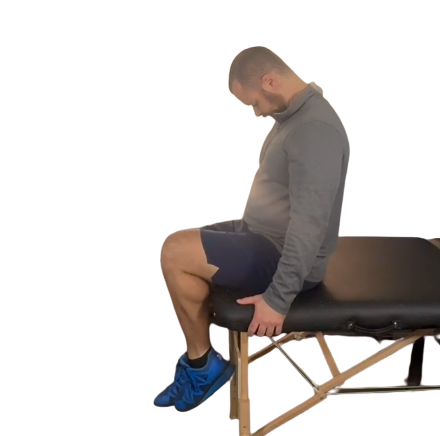
Move slowly and deliberately — about 5 seconds in each direction.
What If It Hurts?
If you feel discomfort:
-
Make the movement smaller
-
Don’t look up or down as far
-
Don’t point your toes as high
-
-
Remove the neck movement
-
Just do the leg portion (a gentler version)
-
Even the modified version can help without irritating the nerve.
Guidelines for Reps and Progression
-
Begin with 10 slow reps per leg
-
If it feels okay, the next day try doing 2 rounds at separate times
-
If tolerated, increase to 3 rounds per day
-
You can eventually do it every few hours — but only if it’s helping
-
If irritation increases, stop
Want to Go Deeper?
If you're serious about reducing your low back pain and restoring your mobility, check out my Free Mini Course.
You’ll learn 4 simple, effective techniques you can start using right away — even if you've been dealing with pain for years.
📚 Reference
Lin L-H et al. Neural Mobilization for Reducing Pain and Disability in Patients With Lumbar Radiculopathy. Life. 2023; 13(12): 2255.
About the Author
Dr. Matt Harris, DPT, MS, is a Doctor of Physical Therapy with over 18 years of experience helping people with spinal conditions. He provides straight-to-the-point back pain solutions — from recovery to lifelong lifting.
Having lived through his own back injuries and guided thousands of patients, Matt knows what it takes to go from pain and setbacks to safe, confident movement.
📩 Start your recovery journey today: Get the free mini course here.
